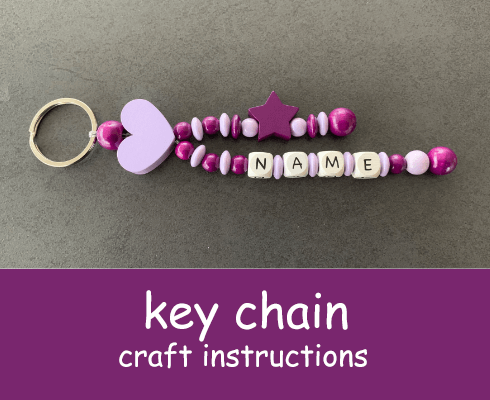
Craft instructions for a key chain with name
It's easy to make a key chain with good instructions. If you help, you can also make such a pendant together with children. Of course, a name pendant is not only suitable as a key pendant. It also looks great on a diaper bag, a backpack or a school bag. Whether you make it for yourself or give it as a gift is up to you. But it will definitely be a great eye-catcher or gift. With our step-by-step instructions, it's very easy to make a name pendant yourself. Thanks to our illustrated instructions, it's a great DIY experience that you're sure to enjoy.
Simply choose the right wooden or silicone beads and the other craft accessories you need. Then you're ready to go!
Craft accessories
- 1 key ring
- PP polyester cord
- 2-3 safety beads, depending on the number of strands
- Motif beads as you like, here e.g. heart and star
- Wooden beads
- Wooden lenses
- Letter cubes for your desired name

Step 1
When you have everything ready, you can start. The best thing to do is to start by sorting and arranging the materials for the keychain so that they match your ideas. There are no limits to your imagination. We always use safety beads when making key pendants, dummy chains, grasping rings or name chains. Since you can sink the knot into a safety bead, we find it more visually advantageous than leaving it visible. In addition, the knot is also protected from small, nimble children's hands.

Step 2
Now take a piece of PP cord and melt the ends with the lighter so that they can be strung through the holes more easily. First pull the string through the key ring. Then take a safety bead (or another bead) and string it on with the big hole facing down. Let the two cords hang down. Push both strings through the motif bead. In our case it is a heart motif bead.

Step 3
Now you can string the beads one after the other for the first strand. When all the wooden beads have been strung, a safety bead follows at the end. The larger opening of this bead points downwards, away from the pendant. Now make a double knot and fuse it. Then you can pull the string from the second strand to sink it.

Step 4
String the beads of the second strand. Again, add a safety bead at the end so that the larger opening faces downwards, away from the pendant. Pull the string as tight as possible to get the double knot as close as possible to the opening of the safety bead. When the knot is in place, you can fuse and sink it.
Of course you can also make just one strand. Or you can take two strings and make a key fob with three or four strands of beads.

3 Advantages of Homemade Key Fobs Made From Wooden Beads
A self-made key fob with a name is just wonderful. Find out why it's such a great idea to make your own key chain from wooden beads:
- Creative freedom: You decide exactly what the key fob will look like: Should it be one, two or three bead strands? What shapes, motifs and colours will the wooden beads have? Would you like to use key rings in a special shape? You can also use crochet beads or letter beads. Using the latter, you can add the first names of your loved ones or the room names of the corresponding keys, for example. That way, you can create a personalised key fob according to your wishes.
- Practical in everyday life: A DIY key fob is really useful in everyday life. On the one hand, the key ring turns several keys strung together into a bunch of keys. Secondly, the key fob gives you a better grip on your keys – especially handy when you're looking for your keys in the depths of your bag or rucksack. And of course, a home-made key fob is a great eye-catcher in everyday life.
- Personalised, versatile gift: The key fob is rightly one of the most popular affordable gift classics. After all, it is a pretty and practical little gift. A homemade fob with a first name is even better – because it's a personalised gift that you've designed yourself, bead by bead.


