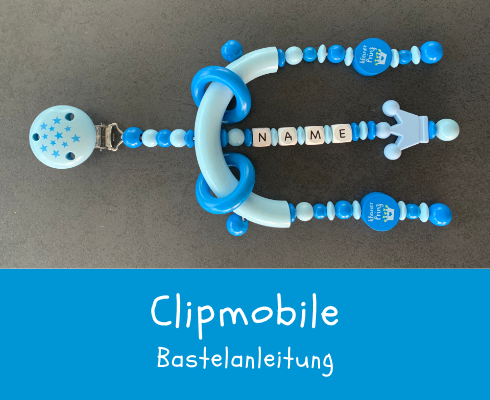
Craft instructions for a clip mobile with name
You want to give a clip mobile as a gift or hang it up for your baby? The best thing to do is to make it yourself. It doesn't matter whether you make the mobile for your baby or for friends or family. Either way, the baby accessory will be something special.
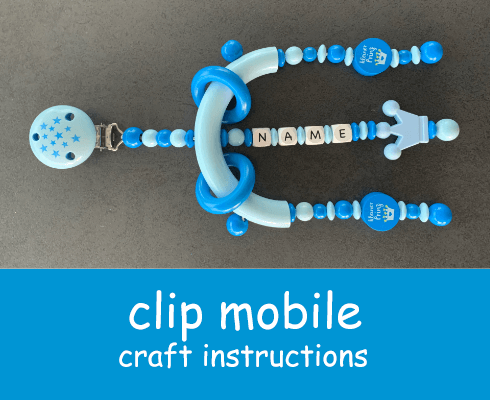
With our step-by-step instructions, it's easy to make your own clip mobile. Thanks to our illustrated instructions, it's sure to be a fun DIY experience for you.
Choose the right wooden or silicone beads and other craft materials. And then you can get started.
Craft accessories
- 1 wooden clip, plain or 1 motif clip
- 1 wooden ring
- PP polyester cord
- 6 safety beads
- Motif beads as you like, here e.g. crowns
- Letter cubes for your desired name
- Additionally at will:
- 1 little bell
- 2 wooden rings in size Mini without holes
Step 1
It's best to sort and arrange the craft materials for your baby mobile until it matches your ideas. Be creative and have fun. We recommend using safety beads to make your mobile. You can hide knots in safety beads. This looks nicer and also protects the knot from the baby's curious hands.

Step 2
Now take a piece of PP polyester cord and string it through the dummy clip's metal eyelet. It is best to melt the cord ends briefly with the lighter to make stringing through the beads easier. String both ends through the safety bead's hole (large opening facing away from the clip). Now tie a tight double knot in one of the ends. Carefully weld it with the lighter and sink the double knot into the safety bead. Now pull firmly on the bead strand. If you are making your own clip mobile, it is important to do a tear test after each knot.


Step 3
String the beads that should be between the clip and the half ring. Then pass the cord through the half ring and string on the remaining beads of the bead strand. At the end follows a safety bead with the big opening facing downwards. Pull the string as tight as possible to get the double knot as close as possible to the opening. When the knot is in place, you can melt it and sink it. It is important that you knot as tightly as possible so that the middle strand's beads cover the cord as completely as possible.

Step 4
Now take another piece of PP polyester cord and melt the ends with the lighter so that they can be strung through the holes more easily. First take a safety bead and string it on. Tie a double knot in the larger hole and melt it with the lighter so that the bead holds. Then sink the knot firmly into the hole. If you want to have a mini ring on the half ring, you now have to put it on the half ring and then pass the cord down through the hole on the side of the half ring.

Step 5
Now you can start stringing bead by bead on the cord you have started on the side, as you have arranged them. At the end, string a safety bead with the opening facing down. Tie a double knot. Pull the string as tight as possible to get the double knot as close to the opening as possible. When the knot is tight and in place, you can weld it with the lighter and press it neatly into the safety bead. It is important that you knot as tightly as possible so that the beads completely cover the cord.

Step 6
Repeat the same process for the second strand of beads on the side.
Please make sure you do a tear test now. This way you can check that the knots are all holding and that the clip mobile won't open. And you have already finished making your baby mobile. Whether it's on the pram, above the cot or above the baby seat – you're sure to find a wonderful place for your DIY work.


5 Advantages of a Homemade Baby Mobile
A self-designed mobile made of wooden beads is a wonderful idea.
- Creative freedom: You make your own mobile. This allows you to choose the wooden beads' colours, motifs and shapes yourself. This way you can design a unique mobile yourself. Personalise it with your child's first name or date of birth.
- Distraction for the baby: Your baby will watch the bead strands swinging around with curiosity. If you add little bells, they can listen to the soft ringing. A little distraction like this is particularly practical above the nappy-changing area. But many parents also like to hang a baby mobile above the baby's cot or cradle.
- Beautiful room decoration: A DIY baby mobile is beautiful to look at and therefore a cute decoration. So how about a homemade mobile for the nursery or in the bathroom above the changing unit? Thanks to the clip, you can hang your mobile anywhere you like.
- Personalised gift for a birth: A mobile is a classic birth gift. If you make it yourself, bead by bead, it is a personal, individualised gift.
- A memory of childhood: Your DIY mobile is an integral part of your everyday life. You will no doubt remember the mobile fondly. So when your child is no longer a baby, keep it as a sweet memento of their childhood.